| 리액트 네이티브 튜토리얼 |
| [#1 리액트 네이티브 맛보기] |
| [#2 Component와 메인화면 분할] |
| [#3 레이아웃 구성하기] |
| [#4 레이아웃 구현 마무리하기] |
| [#5 state] |
| [#6 설정 Modal 만들기] |
| [#7 설정 Modal 기능 추가하기] |
| [#8(구현 끝) 채팅기능 구현하기] |
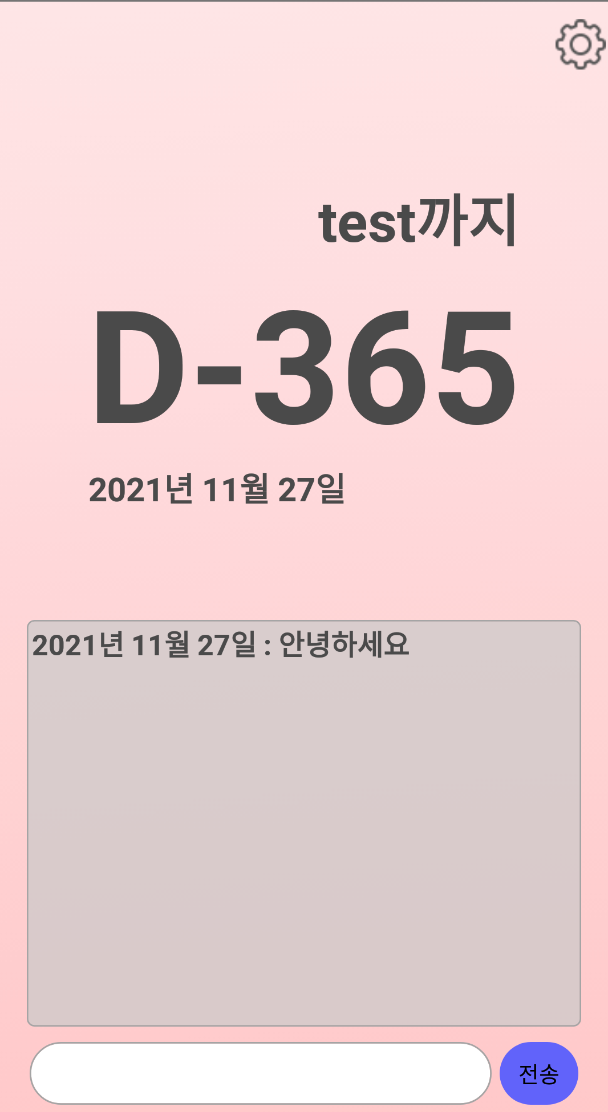
드디어 기능구현의 마지막인 채팅기능을 구현하게됩니다.
새로 이용하는 개념은 별로 없고 이전에 사용했던 asyncstorage를 이용해서 구현합니다.
// App.js

export default class App extends React.Component {
  constructor(props) {
    super(props);
    this.state = {
      dday: new Date(),
      ddayTitle: '',
      chatInput: '', <- 추가해주세요
      chatLog: [],
      settingModal: false,
    }
  }
  ...생략
chatInput에서 입력한 내용을 잠깐 담고있을 chatInput이라는 state를 하나 생성해주세요.
// App.js


  render() {
    return (
      <View style={styles.container}>
        <ImageBackground
          style={{width: '100%', height: '100%'}}
          source={require('./images/background.png')}>

        <View style={styles.settingView}>

          <TouchableOpacity onPress={()=>this.toggleSettingModal()}>
            <Image source={require('./icon/setting.png')}/>
          </TouchableOpacity>
        </View>
        <View style={styles.ddayView}>
          <Text style={styles.titleText}>
            {this.state.ddayTitle}까지
          </Text>
          <Text style={styles.ddayText}>
            {this.makeRemainString()}
          </Text>
          <Text style={styles.dateText}>
            {this.makeDateString()}
          </Text>
        </View>
        <View style={styles.chatView}>
          <ScrollView style={styles.chatScrollView}>
          </ScrollView>
          <View style={styles.chatControl}>

          //TextInput 수정
            <TextInput
              style={styles.chatInput}
              value={this.state.chatInput}
              onChangeText={(changedText)=>{
                this.setState({chatInput: changedText})}
              }
            />
            <TouchableOpacity>
              <Text>
                전송
              </Text>
            </TouchableOpacity>
          </View>
          ...생략
TextInput의 value와 onChangeText를 설정해서 this.state.chatInput에 우리가 입력한 내용이 저장되게 해줍니다.
// App.js

...생략
  makeDateString() {
    return this.state.dday.getFullYear() + '년 ' + (this.state.dday.getMonth()+1) + '월 ' + this.state.dday.getDate() + '일';
  }
  makeRemainString() {
    const distance = new Date().getTime() - this.state.dday.getTime();
    console.log(new Date(), this.state.dday,distance / (1000 * 60 * 60 * 24) )
    const remain = Math.floor(distance / (1000 * 60 * 60 * 24));
    if(remain < 0) {
      return 'D'+remain;
    } else if (remain > 0) {
      return 'D+'+remain;
    } else if (remain === 0) {
      return 'D-day';
    }
  }
  toggleSettingModal() {
    this.setState({
      settingModal: !this.state.settingModal
    })
  }


//새로운 함수를 생성합니다.
  chatHandler() {
    this.setState({
      chatLog: [ ...this.state.chatLog, this.makeDateString() + ' : ' + this.state.chatInput],
      chatInput: '',
    },async ()=>{
      const chatLogString = JSON.stringify(this.state.chatLog);
      await AsyncStorage.setItem('@chat', chatLogString);
    });
  }


  async settingHandler(title, date) {
     this.setState({
       ddayTitle: title,
       dday: date,
     });
    try {
      const dday = {
        title: title,
        date: date,
      }
      const ddayString = JSON.stringify(dday);
      await AsyncStorage.setItem('@dday', ddayString);
    } catch (e) {
      console.log(e);
    }
     this.toggleSettingModal();
   }

   ... 생략
chatHandler라는 전송버튼을 눌렀을 때 작동될 함수를 작성합니다.
chatLog는 여태까지 입력했던 모든 채팅들이 담겨있는 배열입니다.
['2020년 11월 27일: 안녕', '2020년 11월 28일:하이'] 이런식으로 저장됩니다!
javascript에서 list앞에 ...을 붙이면 해당 리스트의 내용을 분해해서 할당합니다.
이를 구조 분해 할당이라고 하고 자세한내용은 developer.mozilla.org/ko/docs/Web/JavaScript/Reference/Operators/Destructuring_assignment 를 참고해주세요.
  chatHandler() {
    this.setState({
      chatLog: [ ...this.state.chatLog, this.makeDateString() + ' : ' + this.state.chatInput],
      chatInput: '',
    },async ()=>{
      const chatLogString = JSON.stringify(this.state.chatLog);
      await AsyncStorage.setItem('@chat', chatLogString);
    });
  }
따라서 chatLog에는 기존에 있던 chatLog 내용에 this.makeDateString() + ':' + this.state.chatInput이 push된 형태가 저장되게 됩니다.
이때 makeDateString은 이전에 만들었던 오늘 날짜를 00년00월00일로 반환하는 함수입니다.
chatInput의 경우 우리가 인풋으로 입력했던 내용이므로 전송버튼을 눌렀을때 초기화 되도록 ''로 설정해주세요.
this.setState의 두번째 인자는 callback함수가 오게되는데, state가 업데이트 된 후 동작할 내용을 작성할 수 있습니다.
만약 위 함수에서 this.setState로 chatLog를 설정한 뒤, 따로 다음 라인에서 해당 내용을 asyncstorage에 저장하게 되면, chatLog가 업데이트 되지 않은 내용이 저장되게 됩니다. 따라서 callback을 이용해서 업데이트가 완료된 후에 저장해줘야해요.
저번 세팅모달때와 마찬가지로 asyncStorage에는 string이 저장되므로, chatLog를 JSON.stringfy로 문자열로 만들어주세요.
그리고나서 @chat이라는 키로 저장합니다.
// App.js

        <View style={styles.chatView}>
          <ScrollView style={styles.chatScrollView}>
          </ScrollView>
          <View style={styles.chatControl}>
            <TextInput
              style={styles.chatInput}
              value={this.state.chatInput}
              onChangeText={(changedText)=>{
                console.log(this.state.chatLog)
                this.setState({chatInput: changedText})}
              }
            />
            <TouchableOpacity
              style={styles.sendButton}
              onPress={()=>this.chatHandler()} <- onPress추가
            >
              <Text>
                전송
              </Text>
            </TouchableOpacity>
만들어준 chatHandler를 전송버튼의 onPress로 설정해주세요.
// App.js

export default class App extends React.Component {
  constructor(props) {
    super(props);
    this.state = {
      dday: new Date(),
      ddayTitle: '',
      chatInput: '',
      chatLog: [],
      settingModal: false,
    }
  }

  //chatLog 추가
  async UNSAFE_componentWillMount() {
      try {
        const ddayString = await AsyncStorage.getItem('@dday');
        const chatLogString = await AsyncStorage.getItem('@chat'); <-추가

	//추가
        if(chatLogString == null){
          this.setState({chatLog: []});
        } else {
          const chatLog = JSON.parse(chatLogString);
          this.setState({chatLog: chatLog});
        }


        if(ddayString == null){
          this.setState(
            {
              dday: new Date(),
              ddayTitle: '',
            }
          );
        } else {
          const dday = JSON.parse(ddayString);
          this.setState(
            {
              dday: new Date(dday.date),
              ddayTitle: dday.title,
            }
          );
        }
      } catch(e) {
        // error reading value
        console.log("ERR", e);
      }
  }
이전에 작업했던 앱이 실행될 때 asyncStorage를 통해서 들고오기위해 작성한 componentWillMount입니다.
dday와 마찬가지로 @chat 키로 chatLogString을 불러옵니다.
만약 불러온 string이 null이라면 채팅로그가 없다는 뜻이므로 chatLog를 []로 설정합니다.
데이터가 있다면 JSON.parse로 배열을 만들어서 chatLog에 저장합니다.
이제 마지막으로 채팅로그를 이용해서 채팅내용을 렌더링 해보겠습니다.
// App.js

const styles = StyleSheet.create({
  container: {
    flex: 1,
  },

  //추가
  chat: {
    fontSize: 18,
    fontWeight: 'bold',
    color: '#4A4A4A',
    margin: 2,
  },


  settingView: {
    flex: 1,
    justifyContent: 'center',
    alignItems: 'flex-end',
    marginRight: '1%',
  },
채팅의스타일을 먼저 작성해주세요.
// App.js

... 생략
	<View style={styles.chatView}>
          <ScrollView style={styles.chatScrollView}>

          //추가
            {this.state.chatLog.map((chat)=>{
              return <Text style={styles.chat}>{chat}</Text>
            })}
          </ScrollView>
          <View style={styles.chatControl}>
            <TextInput
              style={styles.chatInput}
              value={this.state.chatInput}
              onChangeText={(changedText)=>{
                console.log(this.state.chatLog)
                this.setState({chatInput: changedText})}
              }
            />
            <TouchableOpacity
              style={styles.sendButton}
              onPress={()=>this.chatHandler()}
            >
            ...생략
ScrollView 내부에 채팅내용을 렌더링할건데, 이때 map이라는 것을 이용하게됩니다.
map의 javascript의 배열에서 사용할 수 있는 함수입니다.
각 배열의 내용을 받아와서 해당 내용으로 작업을 수행해서 새로운 배열을 만들어서 return합니다.
          <ScrollView style={styles.chatScrollView}>
            {this.state.chatLog.map((chat)=>{
              return <Text style={styles.chat}>{chat}</Text>
            })}
          </ScrollView>
chatLog에서 map을 이용해서 chatLog내용을 chat으로 받아옵니다.
return에는 <Text>를 이용해서 chat의 내용을 렌더링합니다.
즉 위의 map을 실행하게되면 chatLog의 각 내용이 <Text>컴포넌트로 쌓여있는 새로운 배열이 반환됩니다.
총 8글에 걸쳐서 길고길던 앱 제작이 완료되었습니다!!!!
이제는 구현하고 싶던 추가기능들을 직접 구현해보시면 될것같습니다 ㅎㅎ
다음 글에서는 구글 플레이스토어에 등록하고 포스팅을 마무리하도록 하겠습니다!
'Develop > React-Native' 카테고리의 다른 글
| [#7 설정 Modal 기능 추가하기] 환경 구축부터 스토어 출시까지 디데이 앱 따라 만들며 배우는 React Native (3) | 2020.11.17 |
|---|---|
| [#6 설정 Modal 만들기] 환경 구축부터 스토어 출시까지 디데이 앱 따라 만들며 배우는 React Native (2) | 2020.11.15 |
| [#5 state] 환경 구축부터 스토어 출시까지 디데이 앱 따라 만들며 배우는 React Native (0) | 2020.09.30 |
| [#4 레이아웃 구현 마무리하기] 환경 구축부터 스토어 출시까지 디데이 앱 따라 만들며 배우는 React Native (2) | 2020.09.30 |
| release 버전에서 axios 에러가 발생하는 경우 (1) | 2020.09.03 |